Be yourself. Everyone else is already taken. - Oscar Wilde
Showing posts with label Texture Beads. Show all posts

Monday, June 29, 2015

Hot weather claying

Luckily for me I am a night owl.  My j.o.b. has been for many years in a hospital's clinical laboratory. Hospitals are open 24/7 so workers all needed to cover every hour.  Not being a person who likes to get up in the morning, I have worked mostly evenings for the last 20 years.  That means that by the time I get home at midnight, the house has cooled down and I can work with the clay with out it turning into a gooey mess.  I know that compared to the rest of the country right now, the current temp of 83 degrees seems cool.  But we in the Pacific Northwest are not used to it so it seems sweltering to me.

I have been working a bit with some textures, pan pastel chalks and inks.  Just a bit every night. If I wait too long to go to bed, it gets too hot to sleep after the sun comes up.

Most of us Polymer artists have a needle tool.  I discovered that the textured portion of the handle can be used to make little diamond like texture on clay.  I used this tool to texture white clay tubes, the colored with blue and green PP chalk.  After baking, I used black liquid Kato clay to fill in the recesses of the texture.  When I wiped off the excess liquid clay, I found that it also removed the a lot of the color of the chalk.
    To give a bit more zing to the beads, I mixed some interference violet into clear liquid clay that I had tinted with a few drops of Sunshine Yellow ink.
 
Blue chalk highlighted with LKC tinted with yellow ink

Green chalk highlighted with LKC tinted with yellow ink
 Then I tried my hand at a different texture sheet.  I had never used this one before.  It didn't have any design, just a rough texture. Exactly what I was looking for.  Once again, the black LKC took away the color of the chalk.  These started out as a bright yellow. Again I used a final coating of yellow tinted LKC to put some of the color back.  I really like the way these turned out.  Kinda Jade like.


Since the LKC was remove the chalk color, next I tried inks on the base bead.  I colored these with a green ink and then baked.  The color is kind of flat as I did not add any mica powder to the final coat, just to see what would happen.


I made up more white based and colored them with chalks.  Am itching to get back into the studio, but it is soooo hot it will have to wait.  I don't even get tonight .... One of the graveyard techs is on vacation, so I have to work a split evening/graveyard shift to cover. Don't get off till 4 am.

I am so looking forward to retirement and not having to clay around my work schedule ... of course, then I will be too poor to afford the clay LOL.  I am thinking about trying my hand at selling online.  Unfortunately for me, there is already a Polymer Penguin on Esty.

Saturday, June 7, 2014

Can't seem to get beyond simple

 I spend way too much time on Pinterest.  I have three earring boards so far, polymer and non-polymer. You would think that unique designs would rub off on me.  But. ohhh noooooo!  When I sit down to make earrings, all I can do is put some beads on head pins and call it an earring.  I even sweat over which beads to use .... it can take me 15-20 minutes to find a configuration that is pleasing to me and it is just plain simple.   Fancy and creative .... that seems to elude me for the present.
    I want to expand beyond that, so I am going to be taking an earring class from Bea Grob tomorrow at ArtWorks in Edmonds.  Bea is a wonderful artist from Switzerland who is friends with Meredith Arnold (another well know mixed media artist from this neck of the woods).  Bea will be using Pardo Translucent, which I am very excited to finally break down and use.  She had some of her earrings with her at Clay Camp, and they are DIFFERENT than what I usually make.   Maybe something will rub off .... crossing fingers and wishing very hard....

These are some of the earrings that I made recently, mostly using the beads I made at clay camp.
Translucent clay. textured then highlighted with Pan Pastel Chalks. Kinda look a bit like glass.

Wonky beads made into earrings.  You can't tell from the pix, but the pink beads are bigger than the other two bead sets.
Clay was textured by rolling on a texture mat.  Beads on top were highlighted with chalk. The bottom beads were highlighted with Inka Gold Pewter colored paste.

Textured beads are colored with chalks. After baking, I used tinted Kato Liquid Clay to antique and give it a shiny gloss.  The brown bead was  created from a Sutton Slice veneer.  The light green was pearl clay tinted with ink.  Just used scrapes from my table .... no clay is ever wasted!

My favorite beads from clay camp were the green disc beads.  I really like how they turned out. The blue beads were made from the Rustic Bead Tut by Ginger Allman. The pink are simply textured with an old button, then highlighted with chalks.

During my picture taking session, I had help from a different source than usual. She was just fascinated by the dangles.
The Mighty Quinn looking to attack my earring prop.

Saturday, February 22, 2014

Texture beads revisited

So far, the weather here below the Emerald City has been pretty mild for winter time.  We had one snow episode that lasted not even a day before it melted away.  When I see what the rest of the country has had to endure weather wise, I realize how lucky I am to live where I do.  Sure, I do have to put up with SAD due to the almost constant greyness, but Vitamin D and light therapy has helped make it more bearable in the recent years.
   The one complaint I had about the snow day was that I got stuck at the hospital where I work overnight.  That would not have been so bad, but it was the day for sign up for Lori Anderson's Bead Shop Blog Hop.  We are not allowed to access things like blogs, FB etc, from work so I missed it.  No Bead Soup for me this year .... Whaaaa ....

I finally set foot in the studio again after several months of the blahs.  I revisited a tried and true method for me .... texture beads (a big thank you to Lydia Moseley from Diva Designs for the tut).  I experimented with different way to color and finish the beads and now it is time to share them with you. 

  This first picture is the overview of some of  the beads ... several coloring methods included.


 These beads where colored with Pan Pastel Chalks and then I used shoe polish to antique them.  I really like the gritty look they have.  What was great when I made these, was that I was getting over my cold, and still had a stuffy nose. I couldn't smell the polish!  I don't use polish as much as I would like, because of the smell.

 These were colored with Pan Pastels also, but I used Black Kato LC to finish. I love this stamp for creating texture (Cool Tools) 

These beads were also colored with Pan Pastel chalk.  I used black to highlight, and thought it would be too much to also use black LC, so I finished with clear Kato LC.

These beads were colored with acrylic paint and black LC used to antique.  The texture was really not deep enough to get good contrast, but this look can be nice too.


These two sets were colored with chalks.  I only colored the highlighted areas, which created more of a contrast with the black LC.

And lastly, beads that I highlighted with mica powders for the color.  I used both black and clear Kato Liquid Clay for the finishing.  The mica powders were applied before baking, and for the most part stayed on the beads.  If you look closely at the darker green beads, you can see that the powder did not stay put ... when applying the LC, it drifted down into the "valleys" and gave a bit of color there too. 


And, of course, it wouldn't be my blog unless I shared a pix of the cutest kitten in the world (just MHO, of course).  The Quinnitator is getting bigger by the day, and is swiftly taking over dominating the other Underfeet. 
I'm FINALLY tuckered out....think I'll rest a minute or two before attacking your toes again!

Sunday, December 30, 2012

Goal Accomplished (kinda)


I had made a resolution at the start of last year to write something in my blog at least once a week.  To facilitate that goal, I joined the Flickr Group "52 Earrings in one Year" started by Anke Humpert of Anart Island Studios.  While did not  accomplish the goal of posting every week ... I sorta did it in clumps.... I feel good that I finished all 52 pairs by December 31st.
   I just realized it has been a whole month since my last post ... whoa, really ... what the heck was I doing all that time"  No new beads to speak of ... my shoulders are the latest part of my body to start to go.  Cranking the pasta machine is right out for now, at least till my physical therapy starts to show better results. I did get a change to dig around in my stash and find some beads I made earlier this year that I worked up in the last few weeks
  So, tonight I posted my last earring pairs to the group.  I had a lot of fun doing it and got a ton of inspiration from the others who posted to this Flickr group.  I discovered new artists  (not just polymer)  and blogs to follow.  Started pinning a lot at Pinterest.  I can (and have) spend hours there just jumping from one board to another - talk about inspiration!.
    Here are the last 4 earrings from the Challenge.
    The first pair of beads I made up were made from the Texture Tut I got from Lydia at Diva Designs.  They are named after Bette Davis ... the bumps remind me of her famous line  "Fasten your seat belts, it's going to be a bumpy ride".
Bette Dee 
 These beads were made by coloring a base white bead with Pan Pastel Chalks. I made a whole set of these to make into a necklace, but haven't got around to that yet.
JW Patches
 Several of the blogs that I visited off the Flickr earring group do asymmetrical challenges. It is hard for my scientific mind to let go and not strive for absolute symmetry.  This is my attempt at it. It really bothers me that they are not the same length.  This is something that I hope to overcome.  I am currently working on an asymmetrical necklace to help this process along.
1 Pod ... 2 Peas
 My last pair for this challenge were made with a short band of scrap clay left over from another project. It was too colorful to wad up and use as bead guts .. there is no such thing as wasted clay
The Golden Band
Next post will hopefully be my further trials with asymmetry.

Wednesday, November 28, 2012

Where did the year go??

 As usual, I am running behind posting my projects.  I'll blame it on the holidays this time, and the Artisan show.  After all there is nothing wrong with ME...

It is hard to believe that it is almost December. This year just flew by.  Isn't it strange how time speeds up the older one gets?  I remember as a child, how impatient I was waiting for Christmas.  Seemed like it would never arrive.  Now I just turn around, and it is almost upon us.
   And speaking of remembering my childhood, I found these dragonfly beads at the Blue Iris going out of business sale (heavy sigh).  They remind me swimming in the lake near the home I grew up in. Dragonflies were everywhere.  I would lay on the raft a short distance from the shore and watch them hovering over the water.  I was fascinated even then. The earrings I made from these beads are week 48 of the 52 earrings project.
Lakeside Dream Earrings
   As mentioned several posts ago, I purchased River Valley's wonderful Rocky Path tut.  I have been having a lot of fun trying different color combos.  One important tip I must pass on, if you are considering the tut or already have it ... it really pays to follow the directions.  I thought I would try a different texture than the one recommended.  After all, it looked *almost* the same.  While I don't totally dislike the results, they don't have the depth that can be achieved if the right texture is used, as you can see.
Following instructions 

Going down the wrong path

I have also been spending time reorganizing my studio (gasp!).  I would be a top contender for the messy studio award. I do love the surprises that come with the periodic cleaning.  I find beads that I made a last year or the year before that, that I totally forgot about.  It is like receiving an early birthday gift.  So I made these beads (only two of each so I MUST have been thinking earrings when I made them) into earrings for the 52 earrings project.
    
Going Green
Week 46 were made with the only pair of green beads I made using the texture tutorial from Lynda at Diva Designs.  I don't remember if I added mica powder to the clay. I kinda looks like I did.  I have started to write stuff in a journal now, so that I can refer back.  Amazing how long it took me to figure out that this was a good idea.
    Week 47 earrings ...  I vaguely remember these. I was experimenting with adding inclusions to clay.  These are spacers attached to the base bead with little balls of clay. I have no idea why I abandoned this line of clay play. I will have to work more with this idea.
  
Round Peg,  Round Hole


Wednesday, January 18, 2012

Back to the Big Beads

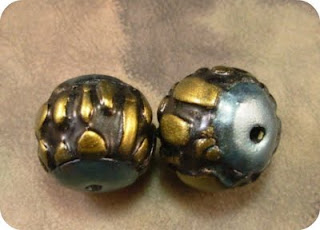
For a while there, all I wanted to make were the large textured beads I learned from Lydia at SC Diva.  Then  I got interested in another technique and was off in a different direction.  But I could not forget how much I like this look, so when I was determined to stoke the creative flame, I started again with Lydia's tut.  I was too lazy to drag out the photo light box, hence the shadows.

   In making the first ones, I was looking for different color, so I combined violet and gold which gave me a deep burgundy.   When I added my final coating (made from a mixture of liquid clay and black ink), an interesting affect happened.  Instead of a black finish, it turned a golden color.  I was not too happy with this look - too dark for my liking.


I had a lot of  burgundy clay left, which I then lighted up by adding white and a touch of ecru to soften the color.  This color is one I like better.  Hard to believe it is the same base color.


Off and running.  The next color was a result of mixing scrap clay for bead guts.  I liked the soft blue.
Opps, forgot the bead cap on one. 

But when I added the antiquing, it turned it more grey.  The two on the right are made using a very small portion of a texture plate. It is the only portion of the plate I like. I wonder why I ever bought it - might have come in a pack.


I have found another source of inspiration on line.  Artybecca has posted several mini tuts on flickr. I was experimenting with one earlier today and hope to post the pictures later this week.


Sunday, June 26, 2011

My first new color

The new Premo colors are trickling into the local Michaels.  I have been waiting for them to go on sale,  but I did use my 40% off coupon to buy one block to try it out.  It was hard to choose but I  have a real weak spot for purple of all hues, and this metallic is just too yummy.


  I found it very soft out of the package,  which caused me to loose some of the fine line texture in these beads.  I was able to put it back in with the help of my CLWI tool though. 

I think I will leach the clay a bit before using it again.

Monday, June 13, 2011

More Texture Beads

I finally had a weekend off from work and  my Opie was away  at a conference -so I had the whole day free to clay.  By the end of Saturday, I realized  I am getting pretty good at making the large texture beads, at least in the round shape.  The next step is trying my hand at tube beads.

I love the light green ones I created earlier in the week.  The color was serendipity, created when I was mixing scrapes for bead guts.  I attempted to recreate the green hue - close but not quite.  I also found a good tool for making texture around the cap of the bead.


I wondered what it would look like if I made a basic black bead and highlighted it with mica powders.  I am not sure if I like the results or not. The first was gold with blue caps.

The next I colored  monotone in green. 


I had yellow left over from earlier in the week, so I grabbed another texture plate and went to town.  The first was antiqued with black ink.


Then I used Espresso Colored Ink to make a lighter antiquing.  These have the little bead ends that add a good finishing touch to the beads.


The next beads used up the last of my yellow clay. I tried a bit different end cap this time using a little Kemper star cutter.


By the way. have you noticed the difference in my photos?  I invested in a light box and have been learning to use it in the last two picture taking sessions.  It really makes a difference.