Be yourself. Everyone else is already taken. - Oscar Wilde

Tuesday, June 28, 2011

CLWI tool explained

  I used a term in my last blog that had some of my readers scratching their heads.  "What in the world",  they queried, "is a CLWI tool?" 

 It is sometimes hard for me to remember that not every is as into Christi Friesen as I am.  There were several tools that she really liked to perform her sculptural magic - but they were usually made from wood or plastic, which are not always the best materials for working with Polymer.  So she has had them made up in metal (available on her site or from her during her classes). 


CLWI - Can't live without it Tool
GHI - Gotta Have it Tool
WIA - Wow, It's Awesome Tool

Here they are, in all their metal glory.


I love them and use them all the time.

For example: I used them to make the leafs in the pendant shown below.  The tendril was made by wrapping a small log around the CLWI tool. The indents in the leafs- GHI tool, the "dipples" - WIA tool.  Even the fold that the hanging tubing goes through was made using the CLWI tool
I have found them invaluable.

Sunday, June 26, 2011

My first new color

The new Premo colors are trickling into the local Michaels.  I have been waiting for them to go on sale,  but I did use my 40% off coupon to buy one block to try it out.  It was hard to choose but I  have a real weak spot for purple of all hues, and this metallic is just too yummy.


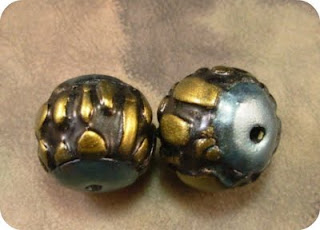
  I found it very soft out of the package,  which caused me to loose some of the fine line texture in these beads.  I was able to put it back in with the help of my CLWI tool though. 

I think I will leach the clay a bit before using it again.

Saturday, June 25, 2011

What's in a name?

I bought an issue of Metalclay Artist Magazine a while back.  Picked up this mag because  there was a good article about photographing jewelry.  What I found even more interesting was on the last page. "Not Untitled: 40+ incentives to name your jewelry" by Marthe Le Van.  I had never really given much thought to naming my pieces. Of course,  I had noticed that PC artists I admire named their works, but always thought that was "above me". After all,  who am I?  Nobody famous - just a midnite clayer. But the points she made really have me thinking. They range from the logical reason "titles make it easier to organize and track your inventory" to the esoteric "titles don't have to say everything, but they should say something", and in between "Titles show that you care about your work".


 I hope you all bear with me as I explore this new idea. Some of the names I come up with may be out there but as Marthe wrote:  "Titles tell your story and give a little insight into your world".  My world can be a bit wonky at times. 

Friday, June 24, 2011

And now for something different

Normally I make jewelery.   But this week I have been thinking ahead to our guild's artisan's gift show scheduled for the fall. I want to offer more than jewelery at my table.  Experimenting with different ideas. Here are some light pulls I made up.

I have other ideas that I want to explore, including trying to design a scarf ring. 

And earrings I made from the left over veneer.
The light pulls were fun to make.  I want to design some for my bed room, with a leaf theme so as to coordinate with my headboard.

Sunday, June 19, 2011

And the winner is.....

Well, its been a week since I announced my "help name my Pengie-Poo" contest.  It turned out that it really wasn't a contest, since only one person suggested a name.

So Tricksy, send me your snail mail and let me know which bead pair you like and I will send them off to you.

I just got Julie Picarello's new book from Amazon just before I left for work,  so I will voraciously reading, absorbing, and trying out projects from it.  To bad I have to work this weekend and so will have to wait till Monday to play....Monday hurry up

Thursday, June 16, 2011

Scads of Earrings

The new photo box has curtailed my claying this week. I have been busy starting to create a more cohesive library of my creations. Since I seem to have a lot of  earrings,  I started there. 


These are a pair of one of the first earrings I made  by covering white beads (made courtesy of the bead roller) with alcohol inks.
This combo created one of my favorite earrings. The ink colors used were Stream and Yellow.  I wear a lot of turquoise so these earrings see a lot of ear time.
These are another pair of my favorites.  The dots were made by carefully removing ink from the solidly colored base.

Here I first painted the white based bead with silver acrylic paint followed by coloring the bead with green ink.  Makes a very shiny bead.


This was made the same as above, only using a pinkish ink. The dots were added afterwards using silver acrylic paint and a toothpick.  Tedious...so there are only a few made this way.


So much for this days ramblings, off to take more pictures and feed the Underfeet.

Monday, June 13, 2011

More Texture Beads

I finally had a weekend off from work and  my Opie was away  at a conference -so I had the whole day free to clay.  By the end of Saturday, I realized  I am getting pretty good at making the large texture beads, at least in the round shape.  The next step is trying my hand at tube beads.

I love the light green ones I created earlier in the week.  The color was serendipity, created when I was mixing scrapes for bead guts.  I attempted to recreate the green hue - close but not quite.  I also found a good tool for making texture around the cap of the bead.


I wondered what it would look like if I made a basic black bead and highlighted it with mica powders.  I am not sure if I like the results or not. The first was gold with blue caps.

The next I colored  monotone in green. 


I had yellow left over from earlier in the week, so I grabbed another texture plate and went to town.  The first was antiqued with black ink.


Then I used Espresso Colored Ink to make a lighter antiquing.  These have the little bead ends that add a good finishing touch to the beads.


The next beads used up the last of my yellow clay. I tried a bit different end cap this time using a little Kemper star cutter.


By the way. have you noticed the difference in my photos?  I invested in a light box and have been learning to use it in the last two picture taking sessions.  It really makes a difference.

Friday, June 10, 2011

My first offical giveaway

I still have not been able to think of a good name for my Penguin mascot.  So I will ask for your help.
It's easy.... just comment and  suggest a name.  I will pick the one I like best and that person will get to pick  one of  the big texture bead pairs that  I featured in my last blog.

I can hear some of you thinking, "what if she doesn't like any of the suggestions?"  In that case, I will pick a name at random and that person will win the beads.

I will select the winner next Friday June17th.  Does this sound like fun???

Please help me. I am soooo tired of being called Pengie-Poo.

Wednesday, June 8, 2011

Texture Bead Experimentation

Lynda at SC Diva (you really need to check out her Esty Shop) makes wonderful beads and jewelery. She  has written tutorials on her techniques, and I recently bought her Texture Bead tut. Life has intervened lately so I had to wait till yesterday to try it out and got so involved that I forgot about my guild meeting till it was too late (drat!!!!)

My first bead I made with some scrap clay just to try it out.  Antiqued with acrylic paint.  It is OK but the clay is too dark for my liking.

I switched to a lighter clay, and using the same texture, also antiqued with acrylic paint.


Then I tried a different texture sheet with a another color that I had left over from my Floral Punk Project.


Switched back to the yellow. This time I wondered what would happen if I used tinted liquid polymer clay instead of acrylic paint as the antiquing medium. I really like how this looks.


 Same texture sheet and color, only made the bead smaller. It is hard to tell in the pictures but these two beads are about half the size of the others.


Wondered what it would look like if I tinted the clay with a different color. This is red pepper colored ink.


Then I tried a different texture and the same red tinted clay.  Don't like this one very much,


I really like these.  There was only a small bit of this clay color so these are one of a kind. The color appeared when I was mixing scrape clay together for bead "guts".


Got another yummy color when mixing my scrape bag.  I love this color and wish I knew how to get this color deliberately.  This was a different texture sheet again.  Wasn't sure if it would work as the texture is so uneven, but it did not turn out too badly.


I am very happy with Lynda's tuts. They are well written, easy to understand, with good pictorial references.

Thanks again Lynda.

Tuesday, June 7, 2011

The Penguin Polymer

I can't believe that I haven't blogged about this until now (and that I haven't written anything in over a week - out of town for the Memorial Weekend, then working every day since then - I'm tired....)

I am the Polymer Penguin. So named because I waddle  when I walk and I have been collecting Penguins even before they became popular (I credit the  penguins of Madagascar for making it easier to find penguins for my collection). But I have NEVER made a penguin from polymer!!!! Can you imagine that - what is wrong with me?

So when a Penguin was in one of the brown bags at the brown bag exchange last month at Clay Camp, I just had to have it, even if it meant "stealing it" when my name was pulled out of the bag.

Here is my new mascot watching over my work at Clay Camp.  Still looking for a good name.


Holly???....  Noel???.......  Flipper????